Make Cold Brew Coffee At Home (you will never go back!)

As a nutritionist, I can tell you that your craving for afternoon coffee has everything to do with adrenal dysfunction or blood sugar…

But I’m not going to get into that today, because the reality is, on a warm summer day in Seattle, there is nothing better than sipping a super smooth, rich, icy cup of cold brew coffee.

Cold brew coffee is stupid easy to make in any case, but this method blows all others out of the water.

Cold-Brew Coffee Recipe

I’m going to get straight to the point here.

I. Love. Coffee.

As a nutritionist, I can tell you that your craving for afternoon coffee has everything to do with adrenal dysfunction or blood sugar…

But I’m not going to get into that today, because the reality is, on a warm summer day in Seattle, there is nothing better than sipping a super smooth, rich, icy cup of cold brew coffee.

Cold brew coffee is stupid easy to make in any case, but this method blows all others out of the water.

Concerned about caffeine? Here’s a great resource for you.

Let’s get to it.


cold Brew coffee concentrate

WHAT YOU NEED

  • 9oz. coffee beans (choose your favorite roast), ground course

  • 3.5 cups (28oz.) filtered water, room temperature

  • 2-quart French press, or 2-quart measuring cup

  • Cheese cloth, old (clean) T-shirt, or nut-milk bag (skip this if using a French press)

  • Himalayan or Celtic Sea salt (optional)

INSTRUCTIONS

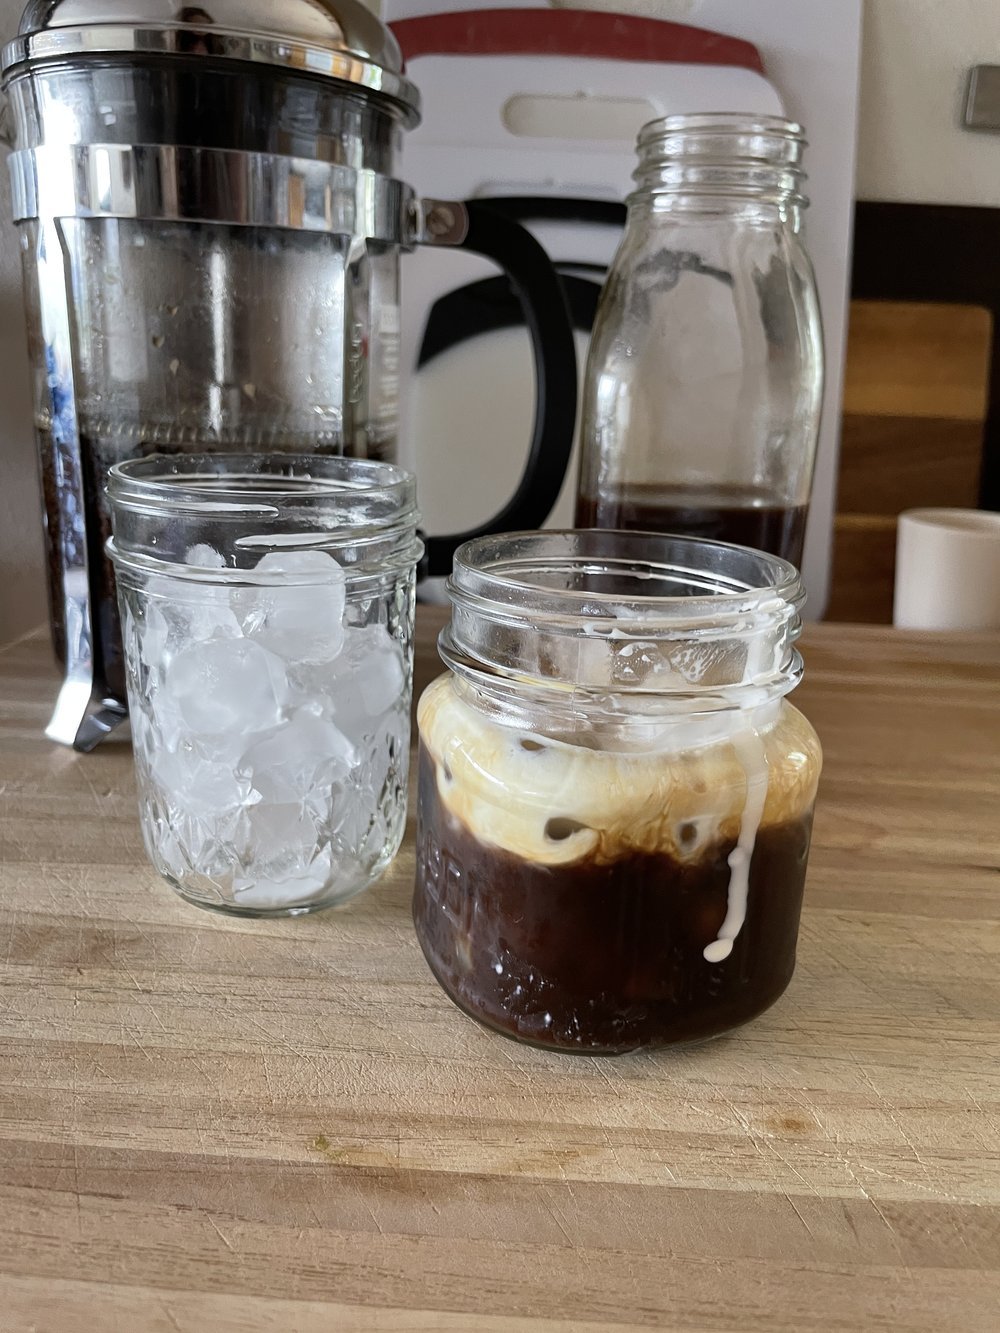
  1. In the French press or measuring cup, place the ground coffee beans. Gently add the filtered water, ensuring all grounds are immersed, let sit for 10 minutes.

  2. Gently stir the grounds to re-wet them. Cover and let sit at room temperature for 24 hours.

  3. If using a French press, press and pour into a glass container with a tight-fitting lid. If not using a French press, filter through cheese cloth, T-shirt, or nut milk bag, and store in a glass container with a tight-fitting lid.

  4. To serve, dilute 1:1, water to concentrate (or pour over ice). Add cream or sugar, if that's how you dig it, and enjoy pure bliss!

This concentrate can be stored in the refrigerator for up to 7 days.

Cold Brew At Home - Nutritional Therapist Health Blog

did you make this recipe?

Share your experience in the comments!

Read More

Easy Weeknight Recipe: Mediterranean Superfood Bowl

This recipe is my favorite in terms of versatility and nutrient density. It’s the perfect healthy recipe for easy summer evenings.

The ingredients can be switched up easily without risking flavor components and can easily adapt to your nutritional needs. The romesco is plant-based on its own, so there’s no need to adapt if you eat vegan.

Easy Healthy Vegan Recipe

This recipe is my favorite in terms of versatility and nutrient density. It’s the perfect healthy recipe for easy summer evenings.

The ingredients can be switched up easily without risking flavor components and can easily adapt to your nutritional needs. The romesco is plant-based on its own, so there’s no need to adapt if you eat vegan.

While the fresh vegetable component does not make this a freezer-friendly meal, the sauce does freeze well. In fact, we eat these often in my home, so I typically will double or triple the recipe for romesco and freeze it in individual portions.

One batch of sauce, greens, & grain, makes 4 bowls. Top to your tummy’s content to make the tastiest healthy recipe!

Want to know how to choose the best quality ingredients for this recipe? This is the best resource for understanding food labels.

Let’s get to the recipe!

health, nutrition, fat, sugar, keto, seattle, heart, inflammation, pain, headache, allergy, migraine, fitness, PCOS, weight loss, gluten, gluten free, muscle, diet, diabetes, hormones, thyroid, detox, mental health, physical health, evergreen

Mediterranean superfood bowls - plant-based and vegan-friendly

FOR THE SAUCE:

  • 16oz JAR ROASTED RED PEPPERS (OR ROAST YOUR OWN!)

  • 1 CLOVE GARLIC, PEELED

  • ½ TSP SEA SALT (MORE TO TASTE)

  • JUICE OF 1 LEMON (ABOUT ¼ CUP)

  • ½ CUP EXTRA VIRGIN, COLD-PRESSED OLIVE OIL

  • ½ CUP WHOLE, RAW ALMONDS

FOR THE BOWLS:

2 CUPS LOOSELY PACKED, CHOPPED (PICK ONE):

  • DANDELION

  • ARUGULA

  • SPINACH

  • BABY KALE

½ CUP UNCOOKED GRAIN (PICK ONE) (omit, if you’re grain-free):

  • QUINOA

  • WILD RICE

  • FARRO

PICK 1-2 FATS/PROTEINS:

  • OLIVES (KALAMATA, GREEN, BLACK)

  • RAW PUMPKIN SEEDS, LIGHTLY TOASTED

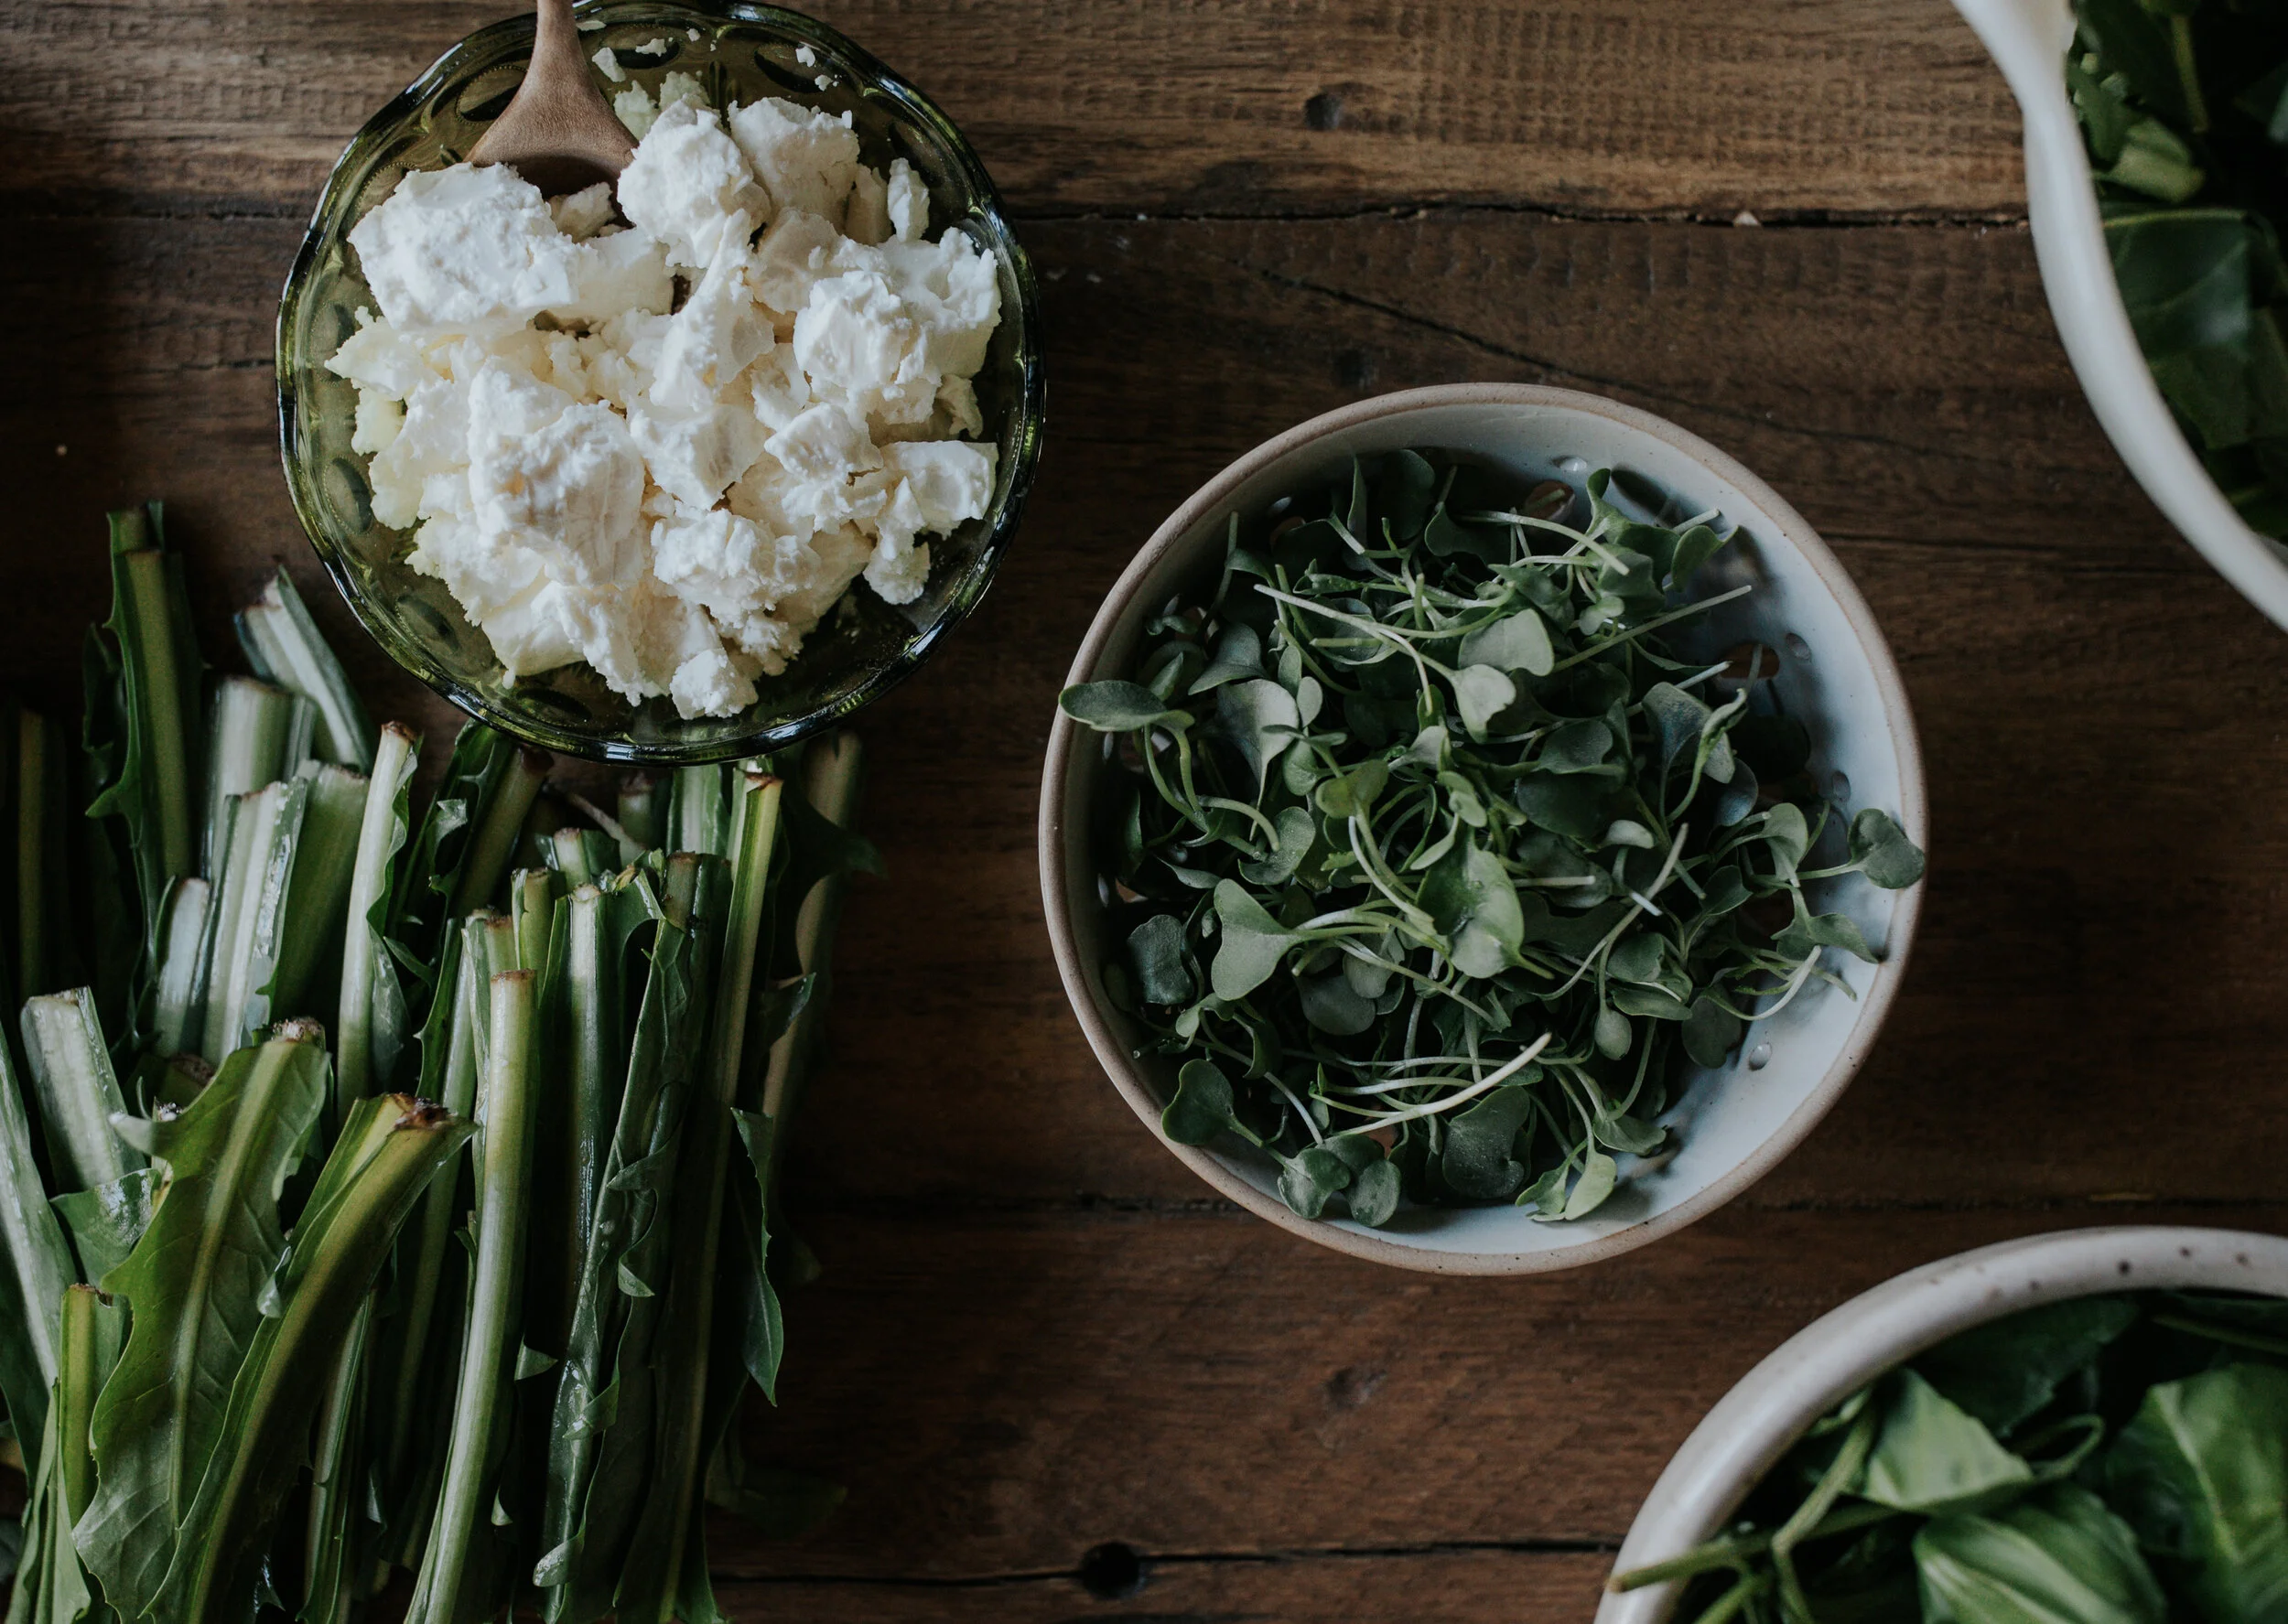
  • CRUMBLED FETA CHEESE

  • QUALITY HUMMUS (OR CHICKPEAS!)

  • AVOCADO

PICK 2-3 (OR 4 OR 5) HERBS/VEG/OTHER TOPPINGS:

  • HEIRLOOM DICED TOMATOES

  • DICED CUCUMBER

  • MICROGREENS

  • SLICED RADISHES

  • ARTICHOKE HEARTS

  • PEPPERONCINI

  • CHOPPED CAULIFLOWER

  • THINLY SLICED RED ONION

  • SLICED GREEN ONIONS

  • FRESH CILANTRO/ITALIAN PARSLEY/BASIL, CHOPPED

  • LEMON JUICE

  • EXTRA VIRGIN OLIVE OIL

  • SALT & PEPPER

  • SLICED JALAPEÑOS

  1. Cook the grain you selected according to package directions (unless omitting). Allow to cool to room temperature.

  2. Place all sauce ingredients in a blender or food processor fitted with a chopping blade. Blend/process on high speed until desired consistency (I prefer it a tad on the “chunky” side).

  3. Prepare the greens and other toppings. There is no hard & fast rule to this – go with your favorite textures & flavors! I prefer my ingredients to be more finely chopped, giving it a “chopped salad” mouth feel, but you may enjoy a chunkier texture.

  4. Divide the greens, grains, sauce, then your toppings, among 4 separate bowls. Enjoy right away, or store in airtight glass containers. Will last 4-5 days in the refrigerator, depending on ingredient freshness.

did you make this recipe?

How’d it go? Share your thoughts in the comments!

Read More

Homemade Trail Mix Recipe Without All The Processed Ingredients

But I’m here to tell you two things about your Trail Mix…

the ingredients in the store-bought Trail Mix, are toxic, and …

I would bet good money that there are at least two ingredients in your store-bought mix that you don’t like. (amiright?)

Easy Healthy Recipe for Summer Time

Maybe it sounds really simple to you, a DIY Trail Mix.

What’s the big deal? Throw in some nuts, raisins, M&Ms - VOILA!

Or, buy it off the shelf! Trail Mix is a health food, right?

But I’m here to tell you two things about your Trail Mix

  1. the ingredients in the store-bought Trail Mix, are toxic, and …

  2. I would bet good money that there are at least two ingredients in your store-bought mix that you don’t like. (amiright?)

What a waste!!


The weather is warming up, and we are getting into more enjoyable hiking & camping weather, here in the northwest.

I effing LOVE this time of year.

And what better staple to have on hand than your tried-and-true Trail Mix. It’s satisfying, lightweight, high fat, high protein, and checks all the flavor and texture boxes. Plus, it has the ability to be PACKED with nutrients.

All of these factors make Trail mix the ultimate “health food” for hiking, right?

But can we really call it a “healthy” choice if it is laden with toxic oils, sweeteners (yes, sweeteners), and they’ve stripped it of nutrients?

Making your own Trail Mix is easy. The struggle comes with choosing quality ingredients.

Most folks (myself included, for a good portion of my life) have not taken the time to evaluate the quality, and operate under the common misnomer that “nuts and fruits can’t be bad for you.

THE HARD TRUTH IS, THEY CAN BE BAD FOR YOU.

So I’m going to help guide you through it.

By the end of this article, you will have a Trail Mix that is loaded with digestible nutrients, free of toxins, and the best portable snack choice to keep around.

headache, allergy, migraine, fitness, PCOS, weight loss, gluten, gluten free, muscle, diet, diabetes, hormones, thyroid, detox, mental health, physical health, evergreen, issaquah, bellevue, renton, burien, bothell, kirkland,

The two main ingredients in a fantastic Trail Mix?

Something SWEET, and something SALTY.

Easy enough…

The SWEET typically comes from dried fruit and chocolate, and there is no need to deprive yourself there.

The SALTY often comes from roasted nuts and seeds.

Let’s talk about the SWEET.

It’s commonly thought that dried fruit is a healthy snack. But what happens when conventional dried fruit is made?

  1. It gets sweeter - When fruit is dried, the fruit’s sugar is concentrated by way of making the actual fibrous tissue smaller, keeping the sugar content the same. Say you typically consume a handful of blueberries in one sitting, and that handful consists of about 20 berries. Now, say you take a handful of dried blueberries, now counting to 60 berries… That is a LOT of sugar in one sitting.

  2. It gets coated in oil - yep, food manufacturers use oil (or corn starch, or more sugar) to coat the fruit after it’s dried, to prevent it from sticking. Very often, the oil used is a canola or vegetable oil, known to be incredibly toxic.

  3. It gets (even more) sweetened - This one just BAFFLES me. Very often, MORE SUGARS are added to the already super-sweet dried fruit. Our culture has been conditioned to think that dried fruit is “healthy” candy. Unless you can find dried fruit that is not coated with toxic oils and sugars, I assure you dried fruit is not a health food.

Next time you are in the market, look at the ingredients on a bag of dried fruit. Should be just fruit, right? It rarely is.

Your best option is to make your own. But most people are not going to do that (and that’s okay - it’s the world we live in!).

If the best option works for you, then go get it, girl! Most of us need to come back to our “Good, Better, Best” mindset that I teach in the Kitchen Detox Workshop.

For many of us, the Better option is more suitable. Look for dried fruits that use better quality oils, like avocado, or coconut. And look for “unsweetened” on the label (then make sure they actually are unsweetened).

I also recommend choosing fruits that naturally contain less sugar, like tart cherries and cranberries.

Another option is to choose freeze-dried fruits, which are much more widely available than they used to be. They often don’t contain sweeteners or oils, but their texture can be ruined if any moisture gets in your Mix, so, use with caution.

health, nutrition, fat, sugar, keto, seattle, heart, inflammation, pain, headache, allergy, migraine, fitness, PCOS, weight loss, gluten, gluten free, muscle, diet, diabetes, hormones, thyroid, detox, mental health, physical health, evergreen,

Ooooh, and the SALTY?

Similar to dried fruits, it’s widely known that nuts & seeds are a staple of a healthful eating habit. Full of Omega 3s, fiber, & protein… They’re satiating, crunchy, and have a variety of flavors.

But did you know that, similar to dried fruit, many store bought, roasted nuts, are laden with the same types of toxic oils used to keep dried fruit from sticking: cottonseed oil, canola oil, vegetable oil…

A common method of roasting nuts is called oil roasting, wherein the nuts are soaked in a sodium chloride solution to remove the skins, then submerged in very hot (increasing the toxicity) oil. They’re basically deep fried.

As the nuts are packaged and stored, the oils continue to increase in rancidity and toxins.

SO, it’s pretty safe to say it’s a good idea to stay away from commercially roasted nuts. Dry roasted nuts are slightly less toxic.

Raw nuts have their own downfalls, too. They are much more rich in antioxidants, vitamin E, omega 3 and omega 6 fatty acids, fiber, minerals… raw nuts are a super food!

But they can be difficult to digest for some individuals, especially when we don’t chew them adequately. They contain something called phytic acid, which binds to the minerals in them, making those nutrients harder for humans to digest.

So what are our choices?

I do sometimes roast my own raw nuts, if I am looking for that lighter crunch factor. It’s fun to mess around with seasonings and make them my own.

But to do that properly can take some time - it’s not difficult, but oven roasting takes a few hours. Not everybody likes to take that time.

The better option is to purchase nuts that are sprouted.

Sprouting the nuts (although not all nuts/seeds can be sprouted) unbinds the phytic acid from important minerals, and allows them to be more easily digested by our human bodies.

👉👉READ MORE ABOUT THE BENEFITS OF SPROUTED FOODS

Sprouted nuts & seeds can be store-bought, or easily made at home from raw nuts & seeds. (this is a terrific guide to sprouting)

Now that we’ve got the ‘why’ sorted out, let’s dig into what you came here for!

MAKING THE ULTIMATE TRAIL MIX!

The ultimate Trail Mix, like everything else in my world of nutrition, is going to be up to YOU!

That’s the greatest part!

No more picking out the peanuts and raisins (my two least favorite components of a traditional mix). I also don’t like seeds in my trail mix because they’re more difficult to eat on the run when they are mixed with bigger components, like cashews or pecans. I prefer seeds for topping on salads, bowls, or smoothies.

Point is, YOU are driving the Trail Mix bus this time, my friend!

I say, take what you like, and RUN with it!

So what are the components of a GOOD Trail Mix?

The ratio of salty:sweet is the most important.

My personal preference is about a 4:1 mix of nuts/seeds:fruit.

For me, it’s more about the low-sweetness factor (I don’t prefer it).

For you, that might look more like a 3:1 or 2:1, or maybe you prefer an all nuts/seed mix with no sweet. That’s okay, too!

The first thing you need to figure out is how much Trail Mix to make to suit your needs. In my family, we eat about 3-6 servings a week. Since I am a huge advocate for batch cooking, I typically make a 7-8 cup batch, which lasts us 7-8 weeks. I store it in an airtight container in a dark, cool cabinet.

By that logic (I’m no math major), you could say to use 1 cup of a nut/seed/fruit ratio for every 3 servings you need. Play around with it, and find what works well for your family!

Once you figure that out, gather your ingredients in the ratio that you prefer, and let’s go!


easy healthy trail mix recipe

INGREDIENTS

  • 7 cups organic, raw, sprouted nuts (I like a mix of macadamia, cashew, pecans, walnuts, and a smaller bit of almonds)

  • 1 cup dried, sour cherries

  • flaked sea salt, to taste

INSTRUCTIONS

  1. In a large mixing bowl, add the cherries. Sprinkle with flaked sea salt, and mix. Since this is primarily where my sweet:salty ratio is coming from (raw nuts are not salted), you want to make sure biting into one of those salty cherries tastes just right!

  2. Add the nuts!

  3. Mix together until well incorporated (the large bowl helps prevent spills)

  4. Pour into airtight container and store in a dark, cool place.

**If opting to flavor your nuts or sprout your own, you will need to make sure they are completely dehydrated prior to mixing, to ensure mold does not contaminate your mix.


was this helpful?

What are your favorite Trail Mix components (or what components do you just dread in a store-bought mix)?

Share them with me and other readers in the comments below!

Read More

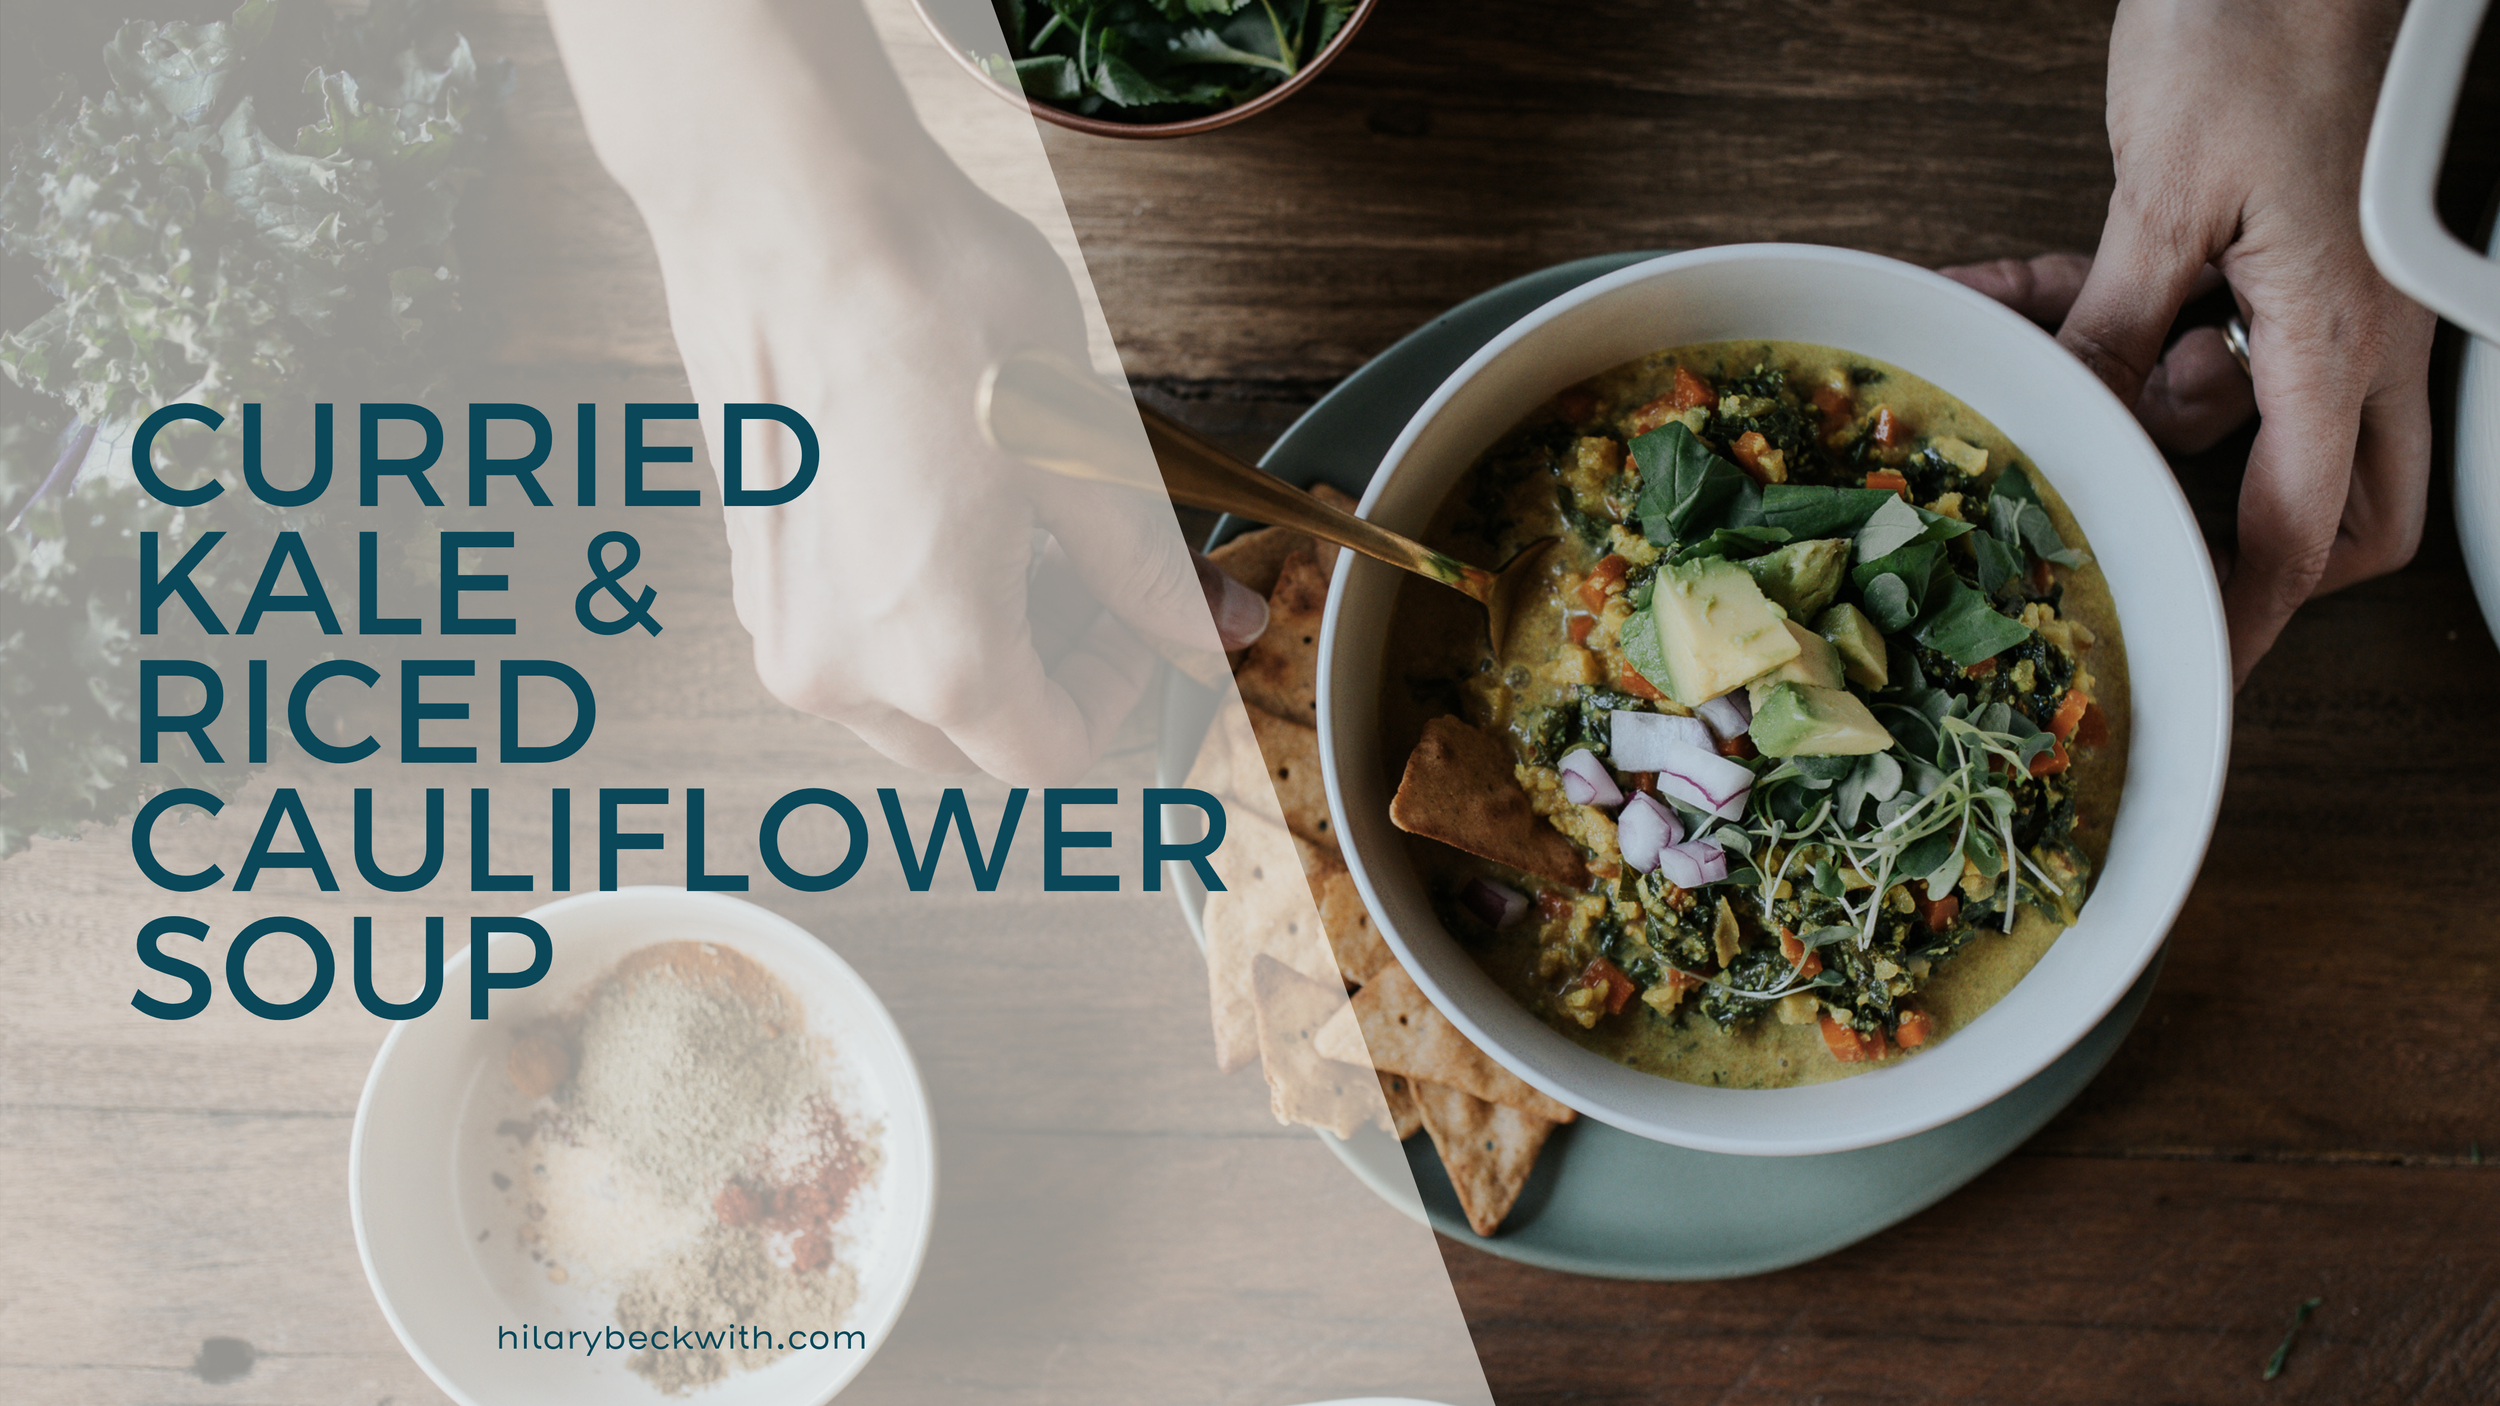
Easy Weeknight Recipe: Healthy Curry, Kale, and cauliflower Soup

This soup is my favorite.

It is soul-warming, nutrient-dense, SO easy, & freezer-friendly.

It is a staple in our home, for exactly those reasons. It can also be easily altered to whole-food-plant-based, if needed.

Make it your own! I love to top it with plain, full fat, grass-fed yogurt, micro greens, avocado, or my personal favorite: GOAT CHEESE (yum!). It would also be delicious with a variety of other vegetables, like parsnips, peas, or some pearl onions.

Easy Healthy Recipe for Weeknight Dinner

THIS SOUP…

This soup is my favorite.

It is soul-warming, nutrient-dense, SO easy, & freezer-friendly.

It is a staple in our home, for exactly those reasons. It can also be easily altered to whole-food-plant-based, if needed.

Make it your own! I love to top it with plain, full fat, grass-fed yogurt, micro greens, avocado, or my personal favorite: GOAT CHEESE (yum!). It would also be delicious with a variety of other vegetables, like parsnips, peas, or some pearl onions.

Curried Kale & Riced Cauliflower Soup

What You Need:

  • 4 CUPS RICED, UNCOOKED CAULIFLOWER*

  • 3 TBSP YELLOW CURRY SEASONING

  • 1 TSP GARLIC POWDER

  • ½ TSP CUMIN

  • ½ TSP PAPRIKA

  • HIMALAYAN SEA SALT & FRESH GROUND BLACK PEPPER TO TASTE

  • 2-3 TBSP COLD PRESSED AVOCADO OR EXTRA VIRGIN COCONUT OIL

  • 1 SMALL RED ONION, CHOPPED

  • 1 TSP MINCED GARLIC

  • 8 CURLY OR TUSCAN KALE LEAVES, STEMS REMOVED, & LEAVES CHOPPED

  • 2 CUPS CHOPPED CARROTS

  • 4 CUPS BROTH (I LIKE TO USE CHICKEN BONE BROTH)

  • 1-14OZ CAN OF FULL FAT COCONUT MILK (avoid using coconut “beverage”)

  • ½ TSP RED PEPPER FLAKES

*  If you can’t find riced cauliflower, or prefer to make your own, it’s very easy. This recipe takes about 1 large head of cauliflower (organic). Remove the leaves, and trim the dry part of the stem, cut into large chunks. Using a large food processor with the shredder attachment, process all of the cauliflower, including stems.

INSTRUCTIONS

  1. Heat a large pot or enameled Dutch oven over medium heat. Once heated, add 2 TBSP of avocado or coconut oil.

  2. Add the riced cauliflower, curry seasoning, garlic powder, cumin, paprika, salt, and black pepper. Sauté until cauliflower just begins to soften.

  3. Add the remaining oil if additional cooking fat is needed, then add the onion and minced garlic, sauté until onion begins to soften.

  4. Increase heat to high, and add the kale, carrots, broth, coconut milk, and chili flakes. Bring to a boil.

  5. Once boiling, reduce heat to medium-low, and let simmer for 20 minutes.

  6. Enjoy with your favorite toppings! Or allow to cool, then freeze in single serving portions for enjoying later.


make this recipe?

Leave a comment to tell me how it went!

Read More